

$
- Price is in US dollars and excludes tax This is a secure SSL encrypted payment.

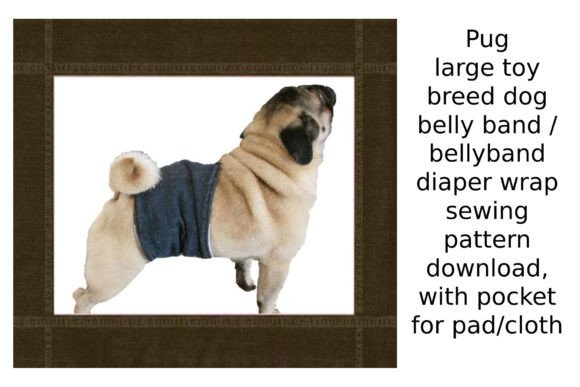
Pug Dog Bellyband Diaper Sewing Pattern
pug large toy breed size dog diaper wrap belly band sewing pattern pdf download
11 pages
prep and make time 1-2 hours
If your precious male pug is piddling where it shouldn’t, you are training him, or your pug baby is older and can’t get to the door fast enough, this is the pattern download for you, if you sew, or know someone who sews, and you need this puppy diaper wrap asap.
Believe me, if I knew that this existed for my late dalmatian Chief, I would’ve made them for him, when he was alive!
This pattern pdf download has 4 sheets to print and tape together, with a long, block space to cut out for where the elastic goes, if you chose to insert a piece of elastic inside, plus photo & text step by step instructions.
The belly band will measure 27 1/2″ x 8″ when finished.
Supplies needed:
fabric for outer cover and inner lining, each panel 28 1/2″ x 9″, or buy 1/4 yard twill / bottom weight / denim or 1/2 yard of cotton cozy flannel –
you can use cotton cozy flannel or twill bottom weight / denim for the outer and inner lining fabrics OR use ripstop nylon for the outer fabric and microfiber cloth for the inner lining. OR you can use denim for the outer fabric and microfiber cloth for the inner lining. OR use cozy flannel or twill / denim for both inner and outer fabric panels, with a stretch nylon pocket for holding a piece of cut up cloth diaper, microfiber cloth, or maxi pad, your choice. The stretch nylon is found in the performance fabric section or dance wear / swimwear section of the fabric store. Buy 1/4 yard and cut a piece 18″ wide, fold in vertical sides twice to make hems on both sides, and the pocket panel will be 16″ wide by 9″ long at that point. You will sew the pocket panel to the inner lining, centered, and sewn on 3 sides, top and bottom, and then on the left vertical side, leaving an opening on the right side for the cloth or pad to be inserted. My Yorkie customer likes the cozy flannel panels with the stretch nylon pocket belly band, while my pug customers likes the microfiber inner lining with elastic, one pug customer likes the ripstop nylon, the other pug customer likes the softer lightweight denim and cotton cozy flannel. So, its your choice.
As of December 2016, I have been using bamboo fleece 70% / 30% organic cotton, 500gsm (grams per square inch), 66″ wide yardages, which should yield about 8 pug size bellybands. You have to buy it online, as of now, through diapersewingsupplies dot com or naturesfabrics dot com, but Nature sells the 60″ wide type. I recommend organic bamboo fleece / organic cotton, because I bought several swatches of other fiber types, including cotton bar mop cloth from Walmart, and microfiber cloths, bamboo terry, and bamboo hemp, and guess which fiber type held the most liquid? Bamboo fleece / organic cotton! It held twice the liquid over microfiber cloth. Now, you can also double up on it, if your dog urinates a lot, or is an older dog, or you can double up on fleece, or double / triple up on cotton flannel layers. Its your choice. I’ve been using bamboo fleece / organic cotton, for my boyfriend’s parents’ pugs, and I’ve seen them since being washed and held up well over the past 2 years. Bamboo fleece / organic cotton does shrink after washing the first time, vertically about 2-3 inches, and it rolls across horizontally, so please factor in an extra 1/2″ for your seam allowances.
Velcro or hook & loop, sew on type, 2″ wide strip, 14″ long, cut into two 2″ x 7″ pieces side by side, to make 4″ by 7″ Velcro closure on the left side of the belly band.
thread: buy a roll to coordinate with the color of the background of the outer fabric, a roll that is the color of the Velcro (comes in white, black, or tan), and a thread color to coordinating with the lining, if its different than the outer fabric. I use Toldi Lock by Gutermann, from Joann Fabrics, and it is a 2500m roll, which is useful for sewing the Velcro on, as you will be sewing a zig zag stitch 4 times around the Velcro pieces, so the big rolls of thread come in handy.
elastic (optional): 3/8″ by 5″ to 5 1/2″ length
This is a fairly easy pattern to make, just pin the pattern to the fabric, sew a stitch line around the outer edge of the fabric panels, for both outer and inner lining fabric panels, and sew stitch line inside the long wide box that you cut out for the elastic pocket, if you so chose to have elastic inserted. After you sew your stitch lines on both panels, place the Velcro strips side by side, both pinned in place, and sew a straight stitch, then zig zag stitch 4xs around the outer edge, stitch length 1, stitch width 5, and straight stitch a box line inside, to secure the Velcro. Sew both strips side by side on the left sides of both inner and outer fabric panels. If you choose to insert elastic, now is the time to pin one end down, zig zag stitch over it, inside the box, then zig zag stitch the other end down. You can do this on either fabric, but whatever panel you use, use coordinating thread to the color of the fabric, and make sure that the elastic is on the inside, so it should be on the other side or back side of the fabric. Then all you have to do is assemble the panels, place the inner lining with Velcro and pocket, if needed, sewn down, facing up, Velcro to the left, opening of pocket to the right. Then place the outer fabric, with Velcro sewn on, on top, facing down, Velcro to the right. pin in place around the outer edge, matching the outer edge’s stitch line as you go. You will need the whole pack of straight pins for this. lol Leave an opening at the top, centered enough to put your hand through and pull it inside out, like a pillow pattern, sewing a stitch line over the stitch line outer edge that you established earlier. Do this twice, make 2 stitch lines to join the panels, plus back stitch on both sides of all 4 corners and at both sides of the opening. Then cut away the excess, getting close to the edge about 1/8″ or even 1/16″ from the stitch line, cutting the corners at 45 degrees, so that when you turn your piece inside out, your corners will be nice and 90 degree angles with no bulk inside.
Now if you choose to have a pocket inside, you will leave an opening at the top and bottom, centered, and you will also only sew down the left vertical side of the pocket, but roll up and pin the pocket panel in, because after you sew the “C” caps, or ends together, you will turn the piece out, and carefully pull the stretch nylon panel out on top and bottom, carefully pinning the stretch nylon panel and openings tucked inside, and then sew them shut.
Now, if you also choose the pocket AND the elastic option, you will follow the steps above for the pocket panel, BUT, and this may take a third hand from someone, or use your chest, and stretch and pin the stitch lines of both sides of the elastic stitch box pocket line, together, start with the ends, join and pin them, then carefully sew the stitch lines together, making sure that the stretch nylon pocket panel is rolled in and out of the way, stretch the piece as you go. You can use the outer fabric’s thread color, and zig zag stitch around your straight stitch for the elastic pocket, or don’t, your choice.
THEN, you can pull out your stretch nylon pocket panel, to pin it in place, tucking it and your seam allowances inside carefully pinning them, so that your stitch line and edge is nice, of course.
Then, you can press it, and stitch a finished line around the outer edge. My pug customer has me run 2 zig zag stitches around the outer edge, on top of the straight stitch line.
You may want to get a couple of microfiber cloths, and sew them together to make the inner lining, some come as a pack of washcloths, others are in packs in the cleaning section. Dollar Tree currently sells yellow and blue ones. You may want to use a heavy duty sewing machine, because of the microfiber and the fabrics being thick, and a heavy duty needle, or 2 or 3, just in case, can use 90/14 needles, but recommend 100/16 or 110/18 size needles.
Just remember the steps listed, and you have the photo and text step by step instructions included, plus a table of contents, supply list, even links to buy the supplies. You can also transfer the pattern to contact paper / drawer liner rolls, to use the pattern over and over again. I hole punched holes around the outer edge of the pattern and along the elastic pocket space that I cut out, and I face the pin points out, pin heads inward. These are just tips, to help.
Thank you!
pug size diaper wrap belly band, with or without stretch nylon pocket, structure, pattern, download, pdf, instructions, printables are all copyright protected by Kristie Hubler. All Rights Reserved. Not for resale. For personal use only. For licensing of pattern and/or download, or wholesale reselling of finished product, please contact Kristie at fabricatedframescom at gmail dot com
Thank you!
Kristie Hubler
creativefabrica dot com / product / fabric-4 / ref / 143998
fabricatedframescom at gmail dot com